A curbless shower’s biggest risk—water leakage—is solved not by a single product, but by designing an integrated water management system.
- The floor’s slope and slip-resistant texture (R11 or DCOF ≥0.60) are the first line of defense for controlling water flow.
- Strategic placement of grab bars and seating improves user stability, which directly reduces accidental splashes and prevents falls.
Recommendation: Prioritize a holistic design where slope, drains, and universal design features work in concert, rather than focusing on individual components.
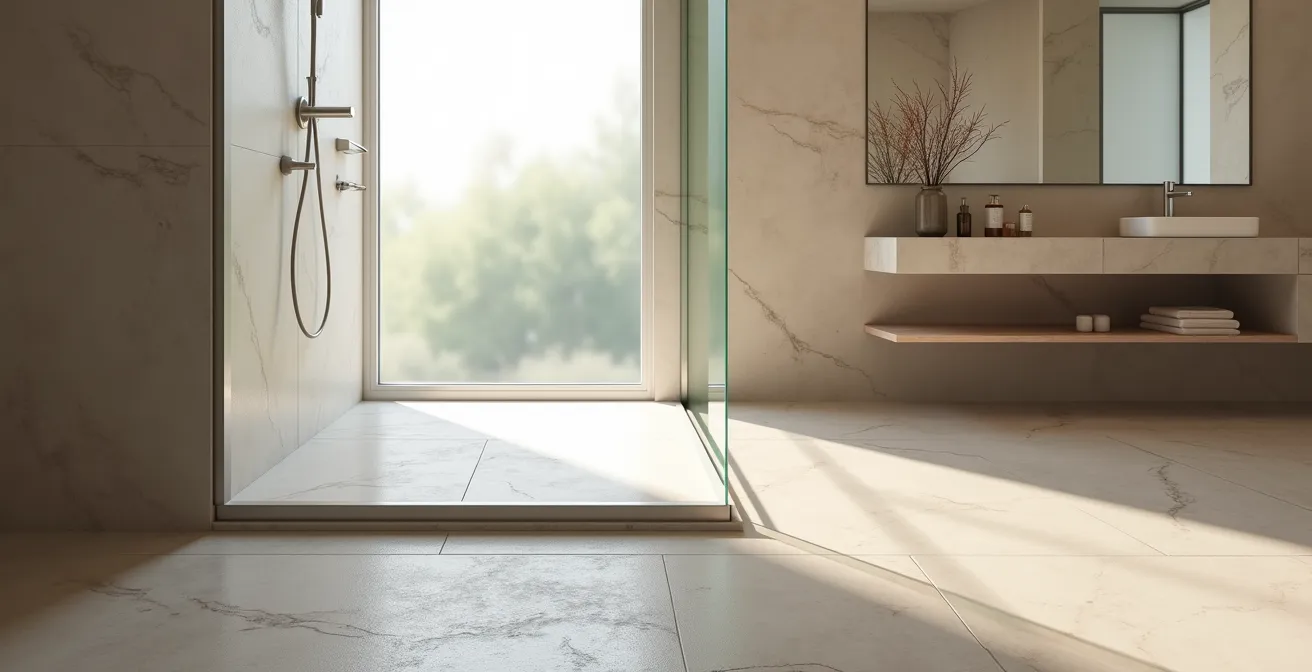
The dream of a sleek, open, and accessible curbless shower often comes with a nagging fear: water everywhere. Homeowners renovating to remove a tub are rightly concerned about leaks, water damage, and creating a slippery mess that spreads throughout the bathroom. The common advice often circles around adding a linear drain or using a specific waterproofing brand, but these are just pieces of a much larger puzzle. Treating these elements as a simple checklist is the primary cause of failure, leading to pooling water and a constant sense of anxiety.
The fundamental flaw in most approaches is focusing on stopping water instead of directing it. A truly successful curbless design doesn’t fight against water; it intelligently manages its flow from the moment it leaves the showerhead to the second it enters the drain. This requires thinking like an engineer, not just a decorator. The key isn’t a single magic product, but a holistic water management system where every component—from the sub-floor slope to the texture of the tiles—works in perfect harmony.
This shift in perspective from “waterproofing” to “water management” is the secret to achieving a shower that is both beautiful and bone-dry outside its designated wet zone. It’s about understanding the physics of water flow, the biomechanics of human movement, and the principles of universal design to create an environment that is inherently safe and contained.
This guide will deconstruct the elements of this integrated system. We will explore how to select the right materials based on scientific ratings, position support elements for maximum leverage and safety, and integrate these features so they enhance your home’s value rather than detract from it. By the end, you will understand how to build a containment zone that offers complete peace of mind.
Summary: A System for a Leak-Proof Curbless Shower
- Why “R10” Slip Ratings Matter for Shower Floor Tiles?
- Vertical vs Horizontal: Where to Mount Bars for Maximum Leverage?
- The Risk of “Hospital Style” Remodels on Home Resale Value
- Built-in Bench vs Movable Chair: Which Offers Better Flexibility?
- Thermostatic Valves: Preventing Scalds in Senior Showers
- Why 90% of Hip Fractures Are Caused by Indoor Falls?
- The Danger of Dropping Medication: Handling Small Pills Safely
- How to Identify Hidden Tripping Hazards in “Open Concept” Homes?
Why “R10” Slip Ratings Matter for Shower Floor Tiles?
The foundation of any successful water management system is the floor itself. While slope directs the water, the tile’s surface texture dictates both safety and how water behaves. A glossy, smooth tile can turn a wet floor into a skating rink and allows water to sheet and spread rapidly. This is where technical slip resistance ratings become non-negotiable. The two most important standards are the R-Rating (a German ramp test) and the DCOF (Dynamic Coefficient of Friction) rating, which is the American standard. While many designers focus on aesthetics, these ratings are the primary data point for safety and water containment.
The R-Rating scale goes from R9 (suitable for dry areas only) to R13 (for industrial wet areas). For a residential shower floor, an R10 rating is the absolute minimum, but R11 is strongly recommended. The DCOF rating measures the friction of a surface when wet. According to industry standards, any interior surface expected to be walked upon when wet must have a minimum DCOF of 0.42. For areas with barefoot traffic and high water presence like shower floors, professionals recommend a DCOF of 0.60 or higher for an enhanced margin of safety.
Choosing a tile with a high DCOF or an R11 rating does more than prevent slips. The microscopic texture that creates this grip also increases surface tension, which helps to slow the spread of water and keep it within the intended drainage path. Furthermore, using smaller format tiles (like 2×2 mosaics) increases the number of grout lines, which act as tiny channels to further manage water flow and provide additional traction. Selecting the right tile isn’t just a design choice; it’s the first and most critical step in engineering your shower’s containment zone.
This table breaks down the most common ratings to help you make an informed choice at the tile showroom.
| Rating System | Value | Application | Safety Level |
|---|---|---|---|
| R9 | Lowest grip | Dry areas only | Not suitable for wet areas |
| R10 | Moderate grip | Occasionally wet areas (bathrooms, kitchens) | Minimum for residential wet areas |
| R11 | High grip | Frequently wet areas, showers | Recommended for shower floors |
| DCOF | ≥0.42 | Level interior wet surfaces | ANSI standard minimum |
| DCOF | ≥0.60 | Pool decks, shower floors | Enhanced safety for barefoot areas |
Vertical vs Horizontal: Where to Mount Bars for Maximum Leverage?
A stable user is a safe user, and a safe user is less likely to make sudden, balance-correcting movements that splash water outside the shower. Grab bars are a critical component of the bathroom safety system, but their effectiveness is entirely dependent on their placement. The debate between vertical and horizontal mounting isn’t a matter of preference; it’s a question of biomechanics. Each orientation serves a distinct physical motion and provides leverage in a different way.
A biomechanical study of older adults found that different tasks require different bar configurations. A horizontal bar, mounted at hip height (typically 33-36 inches from the floor), is optimal for sit-to-stand transfers, such as rising from a shower bench. This orientation allows the user to engage in a powerful “push-off” motion, utilizing their leg and core muscles more effectively and requiring less upper body strength. In contrast, a vertical bar, typically mounted at the shower entrance, is ideal for “pulling” motions. It provides a continuous gripping surface as a person steps over a threshold (even a zero-threshold) or stabilizes themselves while turning. A single bar is rarely sufficient.
The research confirms that to accommodate various movements, a combination of bars is best. An ideal setup includes a vertical bar at the entrance, a horizontal bar along the main shower wall to assist with movement and seating, and potentially an angled bar that provides both types of support. The goal is to create a network of support that anticipates the user’s every move.
As this visualization suggests, optimal placement creates “zones” of support. The key is to provide the right type of leverage where it’s needed most, a finding reinforced by a study on grab bar usage. It revealed that a multi-bar strategy, with horizontal bars for pushing and vertical bars for pulling, offers the most comprehensive support system. This not only prevents falls but also gives the user the confidence to move deliberately, minimizing the risk of erratic movements and splashes.
The Risk of “Hospital Style” Remodels on Home Resale Value
A significant barrier for homeowners considering an accessible renovation is the fear of creating a space that looks clinical and institutional, thereby hurting their home’s resale value. This concern is valid when accessibility is treated as an afterthought, with clunky, chrome-plated fixtures bolted onto an existing design. However, this outdated approach completely misses the point of modern Universal Design, which is about creating beautiful, functional spaces for everyone, regardless of age or ability.
Universal design creates usable spaces for people of all ages, abilities, and stages of life without sacrificing beauty or personalization.
– Capozzi Design Build, Building a Universal Design Bathroom That Lasts
When “stealth accessibility” is integrated from the beginning, it becomes invisible and luxurious. A curbless shower with a sleek linear drain reads as a high-end spa feature, not a medical necessity. A floating vanity looks modern and chic, while also providing crucial clearance for a wheelchair or walker. Comfort-height toilets are ergonomically better for everyone, not just seniors. The key is to choose products that serve a dual purpose: they are both beautiful and functional. When done correctly, these renovations don’t harm resale value; they enhance it by appealing to a broader market of buyers who appreciate thoughtful, future-proofed design. In fact, while not a complete return, accessible bathroom remodels typically bring a 49% return on investment at resale.
Instead of obvious safety equipment, a designer can employ strategies that are seamlessly integrated into the aesthetic:
- Choose designer grab bars that function as towel holders, toilet paper holders, or shelves from brands like Invisia.
- Install a floating vanity at a height that allows for seated use, creating a modern, airy look.
- Use large-format, textured tiles to provide slip resistance without an institutional feel.
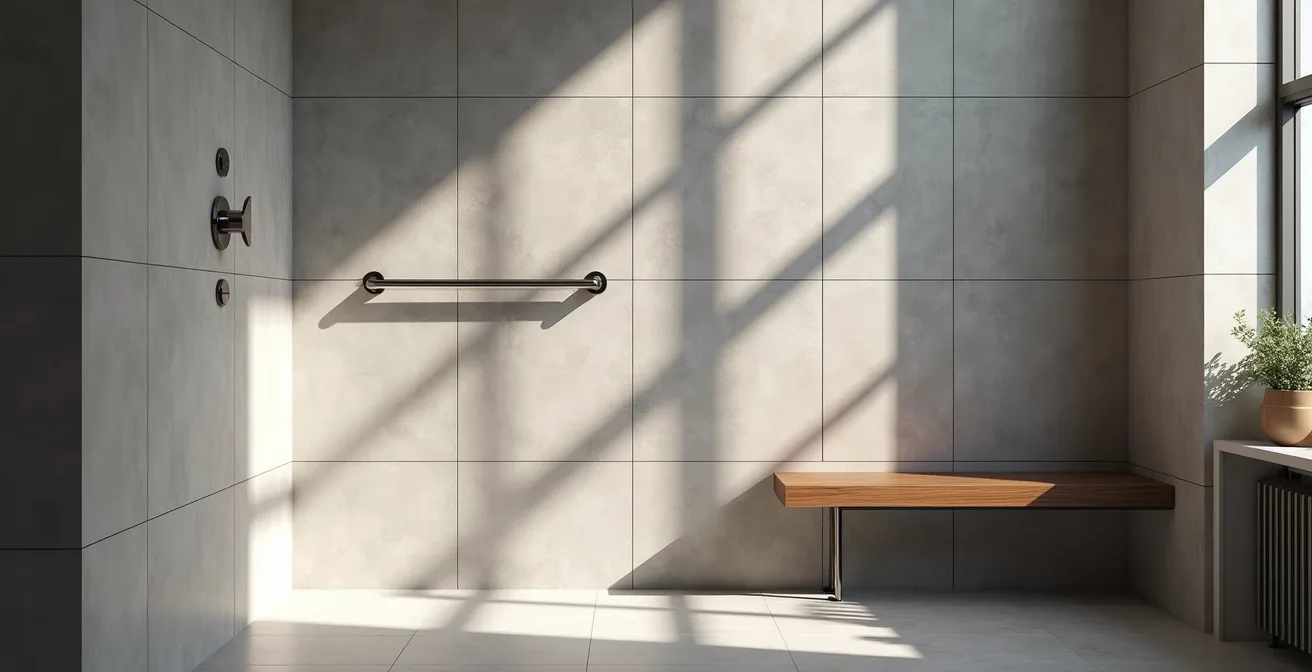
- Incorporate a built-in bench made from the same material as the shower walls for a cohesive, spa-like appearance.
- Select a comfort-height toilet, which is more ergonomic for all users but is especially beneficial for those with mobility challenges.
Built-in Bench vs Movable Chair: Which Offers Better Flexibility?
Shower seating is a cornerstone of a safe and comfortable bathroom, but the choice between a permanent built-in bench and a movable medical chair involves a crucial trade-off between space efficiency, safety, and flexibility. This decision directly impacts the usability of your water management system and should be based on the specific, and potentially changing, needs of the user.
A built-in bench, particularly a floating design cantilevered from the wall, offers superior space efficiency and easier cleaning. It creates a seamless, high-end look and provides an incredibly stable surface for transfers. An occupational therapy assessment of shower seating options concluded that built-in transfer benches extending beyond the wet zone offer the safest transfer for users with significant mobility issues, as there is no gap to navigate. A height of 17-19 inches is optimal for leverage when standing. However, its permanence is its biggest drawback; it cannot be repositioned to accommodate a caregiver or removed if needs change.
A movable shower chair, on the other hand, offers maximum flexibility. It can be repositioned for 360-degree caregiver access, moved to different areas of the shower, or removed entirely if no longer needed. This adaptability is invaluable for users with evolving health conditions. The downsides are significant: chairs take up valuable floor space, can obstruct water flow to the drain, and create a potential transfer hazard due to the gap between the chair and the shower’s exterior. They also have numerous joints and feet that can be difficult to clean and are prone to mold and mildew buildup.
The following table provides a clear comparison of the factors to consider when making this important decision.
| Factor | Built-in Bench | Movable Chair |
|---|---|---|
| Space Efficiency | Maximizes small showers, no floor obstruction | Takes up floor space, can block drainage |
| Transfer Safety | Seamless transfer from outside shower, no gap | Potential gap hazard during transfers |
| Caregiver Access | Fixed position may limit helper movement | Can be repositioned for 360° caregiver access |
| Maintenance | Floating design easier to clean underneath | Multiple joints prone to mold buildup |
| Flexibility | Permanent placement, no adjustment | Easily repositioned or removed as needed |
| Cost | Higher upfront installation cost | Lower initial cost, easily replaced |
Thermostatic Valves: Preventing Scalds in Senior Showers
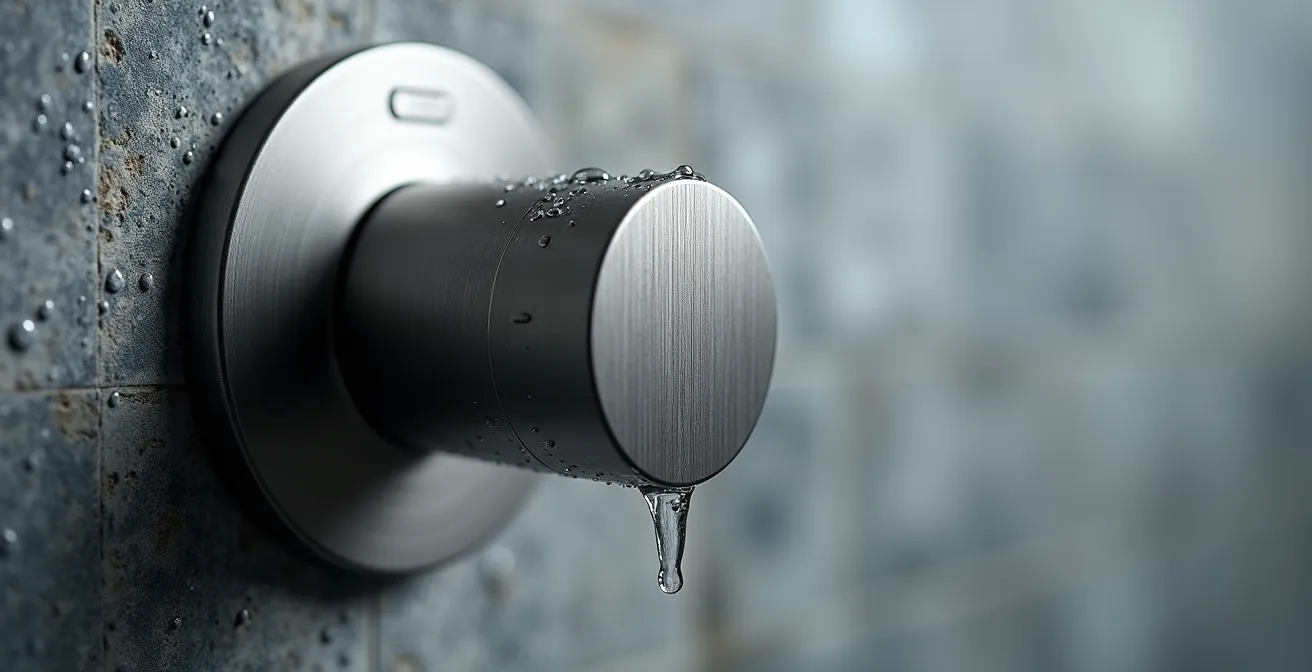
Within the bathroom’s water management system, controlling water *temperature* is as critical as controlling its *flow*. A sudden blast of scalding hot water can cause a person to jump back, leading to a slip and fall, or cause serious burns, especially on the thinner, more sensitive skin of older adults. This is why a simple shower knob is insufficient. A thermostatic valve is an essential piece of safety technology that actively prevents these incidents.
Unlike a pressure-balancing valve, which only balances the ratio of hot and cold water pressure, a true thermostatic valve contains a wax element that physically expands or contracts in response to the water temperature. It constantly monitors and adjusts the water mix to maintain the precise temperature you’ve selected, even if someone flushes a toilet or starts the washing machine elsewhere in the house. This provides a far superior level of protection. The most crucial feature of these valves is an adjustable high-limit stop. This is a physical limit set by the installer (typically to 120°F or 49°C) that prevents the handle from ever being turned into a scalding range.
Beyond the internal mechanics, the ergonomic design of the valve is paramount for accessibility. Look for features that enhance usability for those with limited grip strength or vision:
- Lever handles are much easier to operate than small, round knobs.
- Large, clear, and high-contrast temperature markings that are readable without glasses.
- Color-coded indicators (blue for cold, red for hot) provide an immediate cognitive cue.
- Controls should be installed at an accessible height (38-48 inches from the floor) to be reachable from both a standing and seated position.
Investing in a high-quality thermostatic valve is not a luxury; it’s a fundamental safety component that protects the user from the very shocks that can lead to falls and injuries, ensuring the shower remains a place of comfort, not danger.
Why 90% of Hip Fractures Are Caused by Indoor Falls?
The urgency behind designing a safe, curbless bathroom becomes starkly clear when you look at the statistics. Falls are the leading cause of fatal and non-fatal injuries among older adults, and a staggering percentage of the most devastating injuries—hip fractures—happen indoors. The bathroom is often the epicenter of this risk. According to the National Safety Institute, there were over 8 million emergency room visits for falls in 2019, and the bathroom consistently ranks as the most hazardous room in the home.
Why is the bathroom so dangerous? Research points to a “perfect storm” of risk factors: hard, wet surfaces combined with complex movements like turning, bending, and, most critically, stepping over a bathtub or shower curb. A study on bathroom fall prevention demonstrated that this single act of lifting a leg over a threshold is the primary trigger in a fall chain reaction. It momentarily puts all of the body’s weight on one leg, which is standing on a potentially slippery surface, while the other foot is caught on the curb. The resulting loss of balance is often instantaneous and catastrophic.
This is why a curbless shower design is so much more than an aesthetic choice. By completely removing the threshold, you eliminate the primary tripping hazard at its source. A study analyzing forces during shower entry found that well-placed grab bars could support over 23% of a person’s body weight, but their effectiveness is maximized when the tripping obstacle is removed entirely. The curbless design interrupts the fall chain before it can even begin. When you consider the immense physical, emotional, and financial cost of a hip fracture, the investment in a preventative, well-designed accessible bathroom becomes an obvious and logical decision.
The Danger of Dropping Medication: Handling Small Pills Safely
An often-overlooked aspect of bathroom safety is its role as the primary location for medication management. For many seniors, handling small, hard-to-grip pills is a daily routine, and dropping one is a common occurrence. In a poorly designed bathroom, this minor frustration can escalate into a major fall risk. Bending over to retrieve a tiny pill from a patterned or low-contrast floor can cause dizziness or loss of balance, especially for someone with mobility or vision challenges. If the pill rolls under a vanity or into a corner, the risk increases.
A thoughtfully designed bathroom can mitigate this danger through simple, integrated design strategies. This is about creating a dedicated and secure medication safety zone. One of the most effective strategies is using high-contrast surfaces. A dark countertop makes light-colored pills highly visible, while a white countertop does the same for dark pills. A universal design case study highlighted the impact of this, finding that contrasting surface colors increased pill visibility by an incredible 73%. Task lighting is another critical element; a well-lit vanity area with high-CRI (Color Rendering Index) lighting reduces shadows and makes small objects easier to see.
The design of the space itself plays a role. A curbless, open-concept bathroom floor eliminates obstacles, making it much safer to bend down or use a reacher to retrieve a dropped item without having to navigate a curb or door track. Other strategies include:
- Using a lipped tray or a textured mat in the medication area to contain any dropped pills.
- Positioning the medication zone away from the sink or toilet to prevent pills from falling into water.
- Designing a seated vanity area, which allows medication to be sorted safely without the fatigue of standing.
These small details transform the bathroom from a potential hazard zone into a supportive environment, demonstrating how a holistic design approach can enhance safety in ways that go far beyond just the shower itself.
Key Takeaways
- A leak-proof curbless shower is an integrated “water management system,” not a collection of parts. The floor slope and tile texture are your first line of defense.
- Universal Design, when implemented thoughtfully, enhances a home’s value and appeal by creating a space that is beautiful, future-proof, and accessible to everyone.
- Safety is proactive. Using thermostatic valves to prevent scalds and strategically placed grab bars to support movement prevents the very incidents that lead to falls and injuries.
How to Identify Hidden Tripping Hazards in “Open Concept” Homes?
The promise of a “curbless” or “barrier-free” bathroom is a completely smooth transition from the dry area to the wet area. However, the reality is often subtly different. Hidden tripping hazards frequently exist in the form of small, seemingly insignificant changes in floor level. A transition strip between tile and another flooring material, or a slight lip at the shower entrance that is just shy of being a full curb, can be enough to catch a toe and cause a devastating fall.
Identifying these hazards requires a technical eye and a ruler. According to the Americans with Disabilities Act (ADA), any vertical change in level greater than 1/4 inch is considered a potential tripping hazard that requires a beveled edge. For a truly accessible design, the goal should be an even smaller transition, as close to zero as possible. The ADA standards specify a maximum 1/4 inch vertical rise for thresholds to ensure safety for individuals with mobility aids. This is a hard-and-fast rule that should guide your entire design.
Instead of relying on changes in height to delineate zones, a well-designed space uses visual and textural cues. A shift from a large format tile in the main bathroom to a small mosaic tile in the shower area provides a clear textural signal to the feet that the surface is changing. A contrasting color or decorative border can provide a strong visual cue. Relying on properly sloped floors and high-grip tiles for water containment eliminates the need for traditional bath mats, which are themselves a major tripping hazard. By focusing on creating a single, continuous plane, you build a space that is inherently safer and more elegant.
Your Action Plan: Auditing Floor Transitions for Hidden Hazards
- Survey All Transitions: Use a ruler to meticulously measure every point where flooring materials change—at the bathroom entrance, at the shower entry, and anywhere else. Document any vertical rise.
- Inventory Visual & Textural Cues: Check if transitions are clearly marked. Is there a change in tile color, pattern, or texture to signal the shift from a dry to a wet zone? If not, the transition is less safe.
- Assess Surface Integrity: Look for loose or curled bath mats, which are a primary trip hazard. Ensure any transition strips between different flooring types are completely flush and not raised.
- Audit Low-Light Visibility: Check how visible these transitions are in low light. Consider adding low-level LED strip lighting along the floor to illuminate any elevation changes and define walkways at night.
- Create a Remediation Plan: Prioritize any transition with a vertical rise over 1/4 inch for immediate modification. Plan to replace raised strips with flush ones or regrade the floor for a truly seamless surface.
Frequently Asked Questions on Curbless Shower Design
Why are bathrooms particularly dangerous for older adults?
The combination of brittle bones, poor balance, and wet tile floors creates a deadly mix. Bathrooms require complex movements like turning, bending, and weight shifting on slippery surfaces, making them the highest-risk room in the home for serious falls.
How does a curbless shower prevent hip fractures?
By eliminating the need to lift legs over a threshold, curbless showers remove the primary tripping hazard. This design prevents the loss of balance that occurs when one foot is raised while the other maintains balance on a potentially wet surface.
What is the cost comparison between bathroom remodeling and hip fracture treatment?
While a bathroom remodel for accessibility averages $9,000, the medical costs, rehabilitation, and potential loss of independence from a hip fracture can exceed $50,000 in the first year alone, making prevention a sound financial investment.
Armed with this knowledge, the next step is to partner with a qualified professional who understands these principles of integrated design to create a bathroom that is as safe as it is beautiful.