
In summary:
- Loss of hand dexterity is not inevitable; it can be significantly improved with a targeted, functional approach.
- Grip strength is a critical indicator of overall health and long-term independence, making it a priority.
- Effective training uses simple household items to mimic daily tasks like buttoning, writing, and handling pills.
- For tremors or arthritis, adaptive tools like weighted cutlery and specialized cane handles provide immediate support.
- Improving the environment with high-contrast colors and tactile markers is as crucial as exercise.
That frustrating moment when your fingers won’t cooperate with a shirt button, a key slips through your grasp, or a pill bottle feels impossible to open. For many over 70, these small struggles are a daily reality, chipping away at confidence and independence. The common advice is often to “just squeeze a stress ball,” but this approach misses the bigger picture. True dexterity isn’t just about raw strength; it’s about control, coordination, and the brain’s connection to the hands.
As an occupational therapist, I see clients who are frustrated by these limitations. The good news is that hand dexterity can be restored and maintained. The key is to move beyond generic exercises and adopt a functional-first approach. This means every action you take is designed to directly improve a specific real-world task. It’s not about mindlessly building muscle, but about retraining the intricate system of nerves, muscles, and sensory feedback that allows for fine motor control.
This guide provides a practical, solution-oriented roadmap. We will explore why grip strength is so vital, how to use simple household items for effective training, and how to select the right assistive devices for conditions like tremors, arthritis, or low vision. It’s time to transform frustration into a proactive plan for reclaiming your hand function and securing your autonomy.
To navigate this comprehensive guide, the summary below outlines the key areas we will cover, from foundational principles to specific, actionable solutions for your daily life.
Summary: A Practical Plan to Restore Hand Dexterity
- Why Grip Strength Is the #1 Predictor of Long-Term Autonomy?
- How to Use Simple Household Items for Fine Motor Training?
- The Danger of Dropping Medication: Handling Small Pills Safely
- Weighted Cutlery or Universal Cuffs: Which Helps Tremors Best?
- When to Start Motor Rehab After a Mild Stroke for Maximum Recovery?
- How to Brush Your Teeth with Your Non-Dominant Hand for Brain Growth?
- Derby vs Offset Handle: Which Is Better for Arthritic Hands?
- How to Select Assistive Devices for Low Vision Beyond Magnifying Glasses?
Why Grip Strength Is the #1 Predictor of Long-Term Autonomy?
When we talk about hand function, we often focus on dexterity for small tasks. However, the foundation of all hand use is grip strength. It’s more than just the ability to open a stubborn jar; it’s a powerful and surprisingly accurate biomarker for your overall health and future independence. Think of it as a vital sign, just like blood pressure. A firm handshake or the ability to carry groceries without strain reflects the health of your entire musculoskeletal and neurological system. It is a direct measure of your body’s overall vitality and resilience.
The scientific evidence is compelling and extensive. For instance, recent research has reinforced this connection, showing a stark difference in health outcomes based on grip strength. A 2024 analysis of NHANES data revealed that individuals in the lowest 20% for grip strength had a 2.20 to 2.52 hazard ratio for all-cause mortality compared to stronger groups. This indicates a significantly higher risk of death from any cause.
Furthermore, the landmark Prospective Urban Rural Epidemiology (PURE) study demonstrated that grip strength’s predictive power is remarkable. This massive study followed nearly 140,000 people and found that grip strength was a stronger predictor of all-cause and cardiovascular mortality than systolic blood pressure. For every 5kg reduction in grip strength, the risk of death increased by 16%. This underscores that maintaining your grip is not just a matter of convenience—it is a critical investment in your long-term health and ability to live independently.
How to Use Simple Household Items for Fine Motor Training?
Improving fine motor skills doesn’t require expensive gadgets or a dedicated gym. Your home is filled with excellent tools for task-oriented training. The goal is to perform movements that mimic the challenges of daily life, such as buttoning, zipping, and writing. By using everyday objects, you make the practice relevant and easy to incorporate into your routine. This approach helps the brain directly connect the exercise with a functional outcome, accelerating your progress.
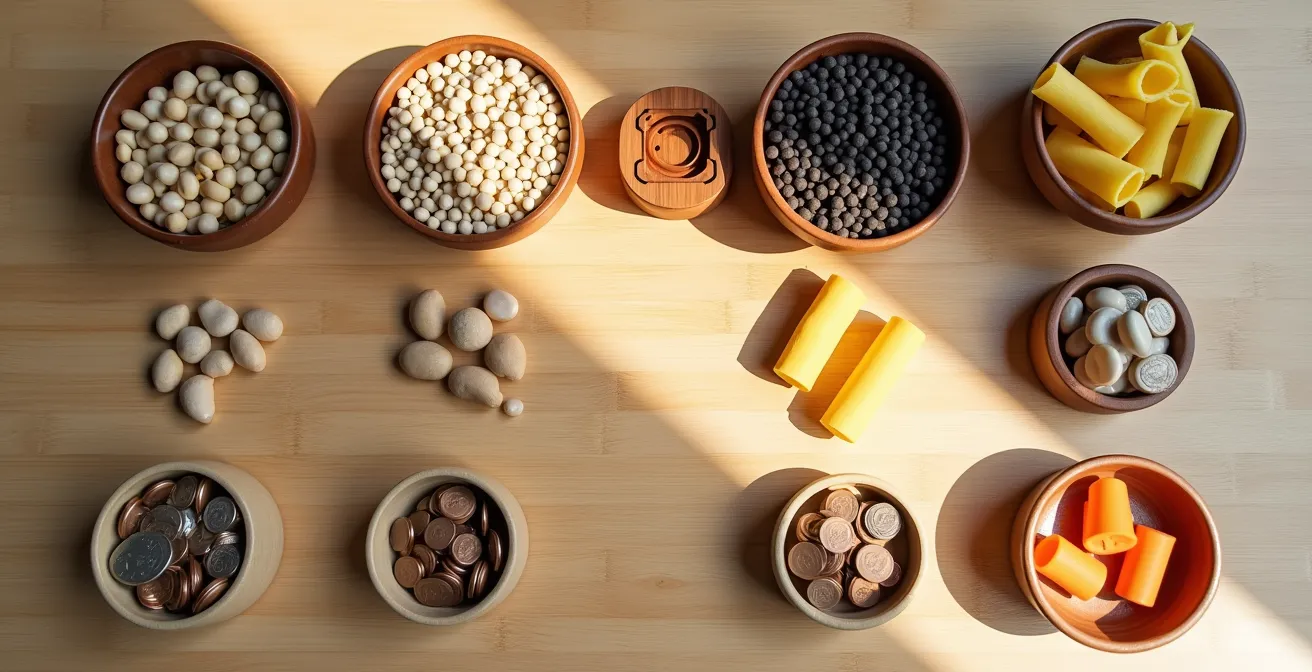
Start by creating small “training stations” with items from your kitchen or sewing kit. The key is to focus on controlled, deliberate movements rather than speed or force. For example, sorting small items requires a precise pincer grasp (using the thumb and index finger), which is the same grip needed for picking up pills or buttoning a shirt. The visual below shows how simple items can be arranged for a powerful dexterity workout.
To get started, try incorporating these simple but effective exercises into your day:
- Sort small items: Use a muffin tin or an ice cube tray to sort objects like dried beans, buttons, coins, or paper clips.
- Play with putty or clay: Rolling, pinching, and squishing therapeutic putty strengthens the small muscles in your hands and fingers. Try hiding coins in the putty and digging them out.
- Finger lifts: Place your hand flat on a table and practice lifting each finger individually. This isolates and strengthens the muscles that control each digit.
- Practice handwriting: Writing in a journal or doing crossword puzzles helps maintain fine motor control. For an added challenge, try writing with your non-dominant hand.
Your 5-Point Home Dexterity Audit
- Identify Tools: List all common household items that require fine motor skills (e.g., zippers, keys, remote controls, jars, medication bottles).
- Gather Training Materials: Inventory simple items you can use for practice (e.g., coins, paper clips, rubber bands, uncooked pasta, putty).
- Assess Task Difficulty: Rate each daily task from 1 (easy) to 5 (very difficult). This helps you prioritize which movements to practice.
- Design a Mimic Exercise: For your top 3 most difficult tasks, create a practice exercise with your training materials (e.g., practice picking up lentils to mimic handling pills).
- Schedule Practice: Dedicate 5-10 minutes, twice a day, to perform these targeted exercises while watching TV or listening to the radio.
The Danger of Dropping Medication: Handling Small Pills Safely
For anyone with reduced hand dexterity, managing daily medication can be a source of significant anxiety. Fumbling with a tiny pill, dropping it, and then struggling to find it on the floor is not just frustrating—it’s a genuine safety risk. A missed dose of a critical medication can have serious health consequences. Therefore, creating a controlled, predictable environment for handling pills is one of the most important functional skills to master. This is not about rushing; it’s about setting yourself up for success with a deliberate and calm routine.
The principle here is to minimize variables and maximize visibility. You want to create a “safe zone” where any mistake is easily correctable. This involves thinking like a pharmacist or a jeweler: controlling the environment to make precise work easier. A few simple adjustments to your routine can make a world of difference, turning a stressful task into a manageable one. The focus is on preparation before you even open the bottle.
Here are the essential steps to create a safe medication handling station, a protocol that reduces risk and builds confidence:
- Always sit at a stable surface: Never handle medication while standing or in a poorly lit area. Use a clear, clutter-free table or desk.
- Use a contrasting, contained surface: Place a dark-colored tray or a shallow dish with raised edges on the table. If a pill is dropped, it will be easy to see against the dark background and contained by the edges.
- Ensure excellent lighting: Position an adjustable LED task lamp so it shines directly onto your workspace, eliminating shadows and making small items clearly visible.
- Use the right tools: If needed, use a pill splitter or a pill organizer to manage doses in advance. For grasping, specialized long-handled tweezers with rubber tips can be helpful.
Weighted Cutlery or Universal Cuffs: Which Helps Tremors Best?
When tremors or a weak grasp make eating a challenge, the goal is to find a solution that restores dignity and enjoyment to mealtimes. Two of the most effective assistive tools are weighted cutlery and universal cuffs, but they work in fundamentally different ways and are suited for different needs. Choosing the right one depends on the specific nature of your difficulty. This is a classic occupational therapy scenario: do you need to compensate for a weakness or dampen an involuntary movement?
Weighted cutlery is designed primarily for individuals with intention tremors, such as those common in Parkinson’s disease or Essential Tremor, where the shaking increases as the hand approaches a target (like your mouth). The added weight provides increased proprioceptive feedback—sensory information from your muscles and joints—which helps the brain better understand the hand’s position in space and can help dampen the tremor. A universal cuff, on the other hand, is a form of adaptive compensation. It’s a strap that secures a standard utensil to your hand, completely bypassing the need for grip strength. This makes it ideal for individuals with severe arthritis, muscle weakness, or paralysis who cannot hold a utensil at all.
The decision between the two depends entirely on your primary challenge. The following table breaks down the key differences to help guide your choice, and it’s worth noting that a 2020 study confirmed that people with Parkinson’s disease found adaptive devices like these useful when eating.
| Feature | Weighted Cutlery | Universal Cuffs |
|---|---|---|
| Best For | Intention tremors (tremor increases as you approach target) | Weak grasp or severe arthritis |
| How It Works | Added weight (4oz typical) dampens tremors through proprioception | Straps utensil to hand, bypasses need to grip |
| Function Type | Both adaptive and rehabilitative – can help brain re-learn control | Purely adaptive – compensates for weakness |
| DIY Test Method | Add wrist weights or rubber bands to existing utensils | Use elastic bandage to secure utensil to palm |
When to Start Motor Rehab After a Mild Stroke for Maximum Recovery?
For individuals recovering from a mild stroke, the question of “when” to begin intensive rehabilitation is absolutely critical. The brain’s ability to repair and reorganize itself, a process known as neuroplasticity, is not constant. Research has identified a “critical window” during which the brain is most receptive to therapy, and engaging in intensive rehabilitation during this period can lead to significantly greater recovery of motor function. Starting too early or too late can diminish the potential for improvement.
The period immediately following a stroke is focused on medical stability. However, once a person is stable, the clock starts ticking on this optimal recovery window. While some improvement can occur at any time, the most dramatic gains are concentrated within a specific timeframe. Authoritative research from the National Institutes of Health (NIH) provides a clear answer: intensive therapy produces the greatest improvement when administered 2-3 months after a stroke. This is the period when the brain is primed for rewiring and forming new neural pathways to compensate for damaged areas.
What does “intensive therapy” mean in this context? It refers to high-repetition, task-specific training guided by an occupational or physical therapist. For hand dexterity, this could involve:
- Constraint-Induced Movement Therapy (CIMT): Restraining the unaffected arm to force the use and retraining of the affected arm and hand.
- Repetitive Task Practice: Repeatedly performing components of daily activities, such as picking up blocks, turning pages, or using utensils.
- Mirror Therapy: Using a mirror to create a visual illusion of the affected hand moving normally, which can help activate motor pathways in the brain.
The key takeaway is that for maximum recovery after a mild stroke, a passive “wait and see” approach is not optimal. Proactively engaging in a structured, intensive rehabilitation program during the 2-to-3-month post-stroke window is the evidence-based strategy for reclaiming as much motor function as possible.
How to Brush Your Teeth with Your Non-Dominant Hand for Brain Growth?
While much of our focus is on restoring function, there is also immense value in challenging our brains to maintain and even grow cognitive and motor skills. One of the simplest and most effective ways to do this is by performing familiar tasks with your non-dominant hand. This practice is a powerful form of neuroplasticity in action. When you brush your teeth with your opposite hand, you force your brain to activate less-used neural pathways and create new connections. It feels awkward precisely because your brain is working hard, which is a sign of a healthy cognitive workout.
This isn’t just a quirky brain game; it has practical implications for long-term dexterity. Research shows that manual dexterity seems to remain stable until about age 65, after which it can decline, often more quickly in the non-dominant hand due to less frequent use. Regularly challenging your “other” hand helps counteract this decline and builds a cognitive reserve that supports motor skills on both sides of the body.
Brushing your teeth is the perfect starting point because it’s a low-stakes, daily activity. Start small, perhaps for just 30 seconds, and focus on the sensation. Don’t worry about being perfect; the goal is the effort itself. As you get more comfortable, you can incorporate other small challenges throughout your day to keep your brain engaged and your hands capable. Here are some easy ways to get started:
- Stir your morning coffee or tea with your non-dominant hand.
- Use the TV remote with your opposite hand.
- Practice opening doors or turning on light switches with your non-dominant hand.
- Try eating a snack or a portion of a meal using utensils in your opposite hands.
- Attempt to write your name or a short sentence once a day with your non-dominant hand.
Derby vs Offset Handle: Which Is Better for Arthritic Hands?
For individuals who rely on a cane for stability, the handle is the most important feature for comfort and safety, especially for those with arthritis in the hands or wrist. An ill-fitting handle can cause pain, increase fatigue, and even lead to a less stable grip. The two most common and effective handle types are the Derby and the Offset. While they may look similar, they distribute weight differently and are designed for distinct use cases.
The Derby handle is the classic, elegant choice. It features a gentle curve that is comfortable to hold and has the practical benefit of being able to hook over your arm or a tabletop. Its primary characteristic is that it centers your weight directly over the shaft of the cane. This is perfectly suitable for intermittent use or for those who need a cane more for balance than for significant weight-bearing. For someone with mild arthritis who uses a cane for social outings, the Derby is an excellent option.
The Offset handle, by contrast, is engineered for function over form. It has a distinctive bend near the top that positions the handgrip directly over the center of the shaft, which is crucial for anyone who needs to put significant weight on the cane. This design minimizes pressure and torque on the wrist, making it far superior for all-day use or for individuals with moderate to severe wrist arthritis. The grip is also often made of softer, more cushioned materials to absorb shock. The table below provides a clear comparison to help you choose the best fit for your needs.
| Handle Type | Derby Handle | Offset Handle |
|---|---|---|
| Weight Distribution | Weight centered over shaft | Aligns weight directly over cane shaft, minimizing wrist torque |
| Best Use Case | Intermittent use, social occasions | All-day support, continuous use |
| Appearance | Elegant, traditional look | More medical/functional appearance |
| Special Features | Can hook over chairs and tables | Superior support for arthritic wrists |
| Handle Material Options | Wood, plastic, or gel padding | Often soft gel or cushioned materials |
Key takeaways
- Your grip strength is a vital sign for your overall health and a strong predictor of your future independence.
- You don’t need fancy equipment; purposeful practice with everyday household items is highly effective for improving fine motor skills.
- For specific challenges like tremors or arthritis, the right adaptive tools (like weighted cutlery or offset canes) offer immediate and significant quality of life improvements.
How to Select Assistive Devices for Low Vision Beyond Magnifying Glasses?
Hand dexterity is not just about the hands themselves; it’s about hand-eye coordination. When vision is diminished, the brain receives less accurate information about where an object is, making tasks like picking up a fork, pressing a button, or pouring a glass of water much more difficult. While magnifying glasses are a common solution, a truly functional approach involves adapting the environment to provide the brain with other types of sensory information, primarily through contrast and touch. This strategy makes the world easier to navigate and reduces the strain on your hands to be perfectly precise.
The goal is to make your environment “speak” to your hands. By increasing the contrast between objects and their backgrounds or by adding tactile cues, you give your brain the clear signals it needs to guide your movements accurately. This is a core principle of occupational therapy: modify the environment to enable function. These modifications are often simple, inexpensive, and can be implemented immediately to make a noticeable difference in your daily independence and safety.
Instead of relying solely on magnifying visual information, consider these environmental and tactile solutions to support your hand-eye coordination:
- Use high-contrast colors: Place a dark placemat on a light table to make your plate and utensils stand out. Use a light-colored cutting board for dark vegetables and a dark board for light ones.
- Apply tactile markers: Place “bump dots” (small, raised adhesive dots) on key buttons on your microwave, remote control, or phone. This allows you to identify them by touch alone.
- Add bright tape: Apply brightly colored electrical or duct tape to light switches, drawer pulls, and the handles of important tools to make them visually pop from their surroundings.
- Install focused lighting: An adjustable LED task lamp aimed directly at your workspace (e.g., where you prepare food or read your mail) can dramatically improve visibility for hand-related tasks.
Start by choosing one small action from this guide today. Whether it’s sorting coins for five minutes or placing a dark placemat on your table for dinner, every purposeful act is a step toward reclaiming your confidence. Consistent, functional practice is the key to maintaining your independence for years to come.