In summary:
- Treat your home as a system with potential failure points; indoor falls are the primary cause of serious injury like hip fractures.
- Systematically address high-risk zones: clear pathways, secure all rugs or remove them, and automate lighting for nighttime navigation.
- Invest in proactive injury mitigation (hip protectors) over purely reactive systems (fall monitors) for high-risk individuals.
- Incorporate balance exercises into daily routines by creating safe “training zones” in areas like the kitchen.
- Prepare for a professional Occupational Therapy assessment by documenting daily challenges; this is the definitive step to creating a truly safe environment.
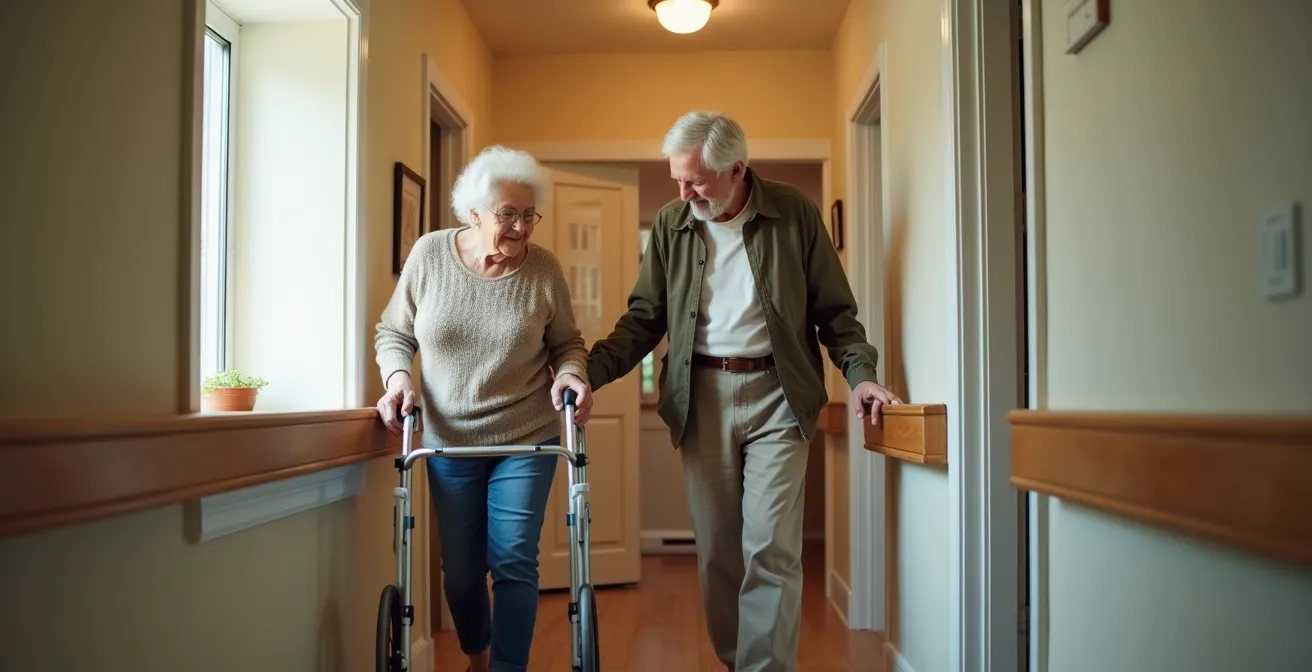
The conversation is never easy, but it is urgent. Your parents’ multi-level home, a place of memory and comfort, has become a landscape of unacknowledged risks. Every staircase, every dimly lit hallway, and every unsecured rug is a potential failure point. The conventional advice is to “declutter” or “add a few grab bars,” but this approach is dangerously superficial. It fails to address the complex interaction between an aging body, with its changing balance and vision, and the static environment it navigates every single day.
This is not about bubble-wrapping a house. It’s about performing a systematic safety audit. The true key to preventing a life-altering fall is to shift from a mindset of casual tidying to one of strategic environmental engineering. We must analyze the ‘path of travel’—the predictable routes taken from bedroom to bathroom, from kitchen to living room—and harden these pathways against failure. We must understand the physics of a trip and the biology of an injury to make informed decisions.
This guide abandons platitudes. Instead, it provides a meticulous, auditor-level framework for identifying and neutralizing the most critical fall risks in a multi-level home. We will move room by room, hazard by hazard, to transform your parents’ home from a collection of potential threats into a supportive environment that actively promotes their independence and safety. This is a mission of prevention, and it must begin now.
This article will guide you through the critical audits and modifications required to secure each high-risk area of the home. Follow this table of contents to navigate the essential steps for creating a safer living space for your aging loved ones.
Summary: A Systematic Guide to Home Fall-Proofing
- Why 90% of Hip Fractures Are Caused by Indoor Falls?
- How to Declutter Hallways Without Sacrificing Personal Belongings?
- The Risk of Throw Rugs: The #1 Cause of Living Room Falls
- How to Install Motion-Sensor Night Lights to Prevent Bathroom Falls?
- Hip Protectors vs Fall Monitors: Which Investment Saves Lives?
- How to Safe-Proof the “One-Leg Stand” Exercise in Your Kitchen?
- How to Program Motion Sensors to Light the Path to the Bathroom?
- How to Prepare for an Occupational Therapy Home Assessment?
Why 90% of Hip Fractures Are Caused by Indoor Falls?
The perception is that catastrophic falls happen on icy sidewalks or uneven public terrain. The reality is far more mundane and far more dangerous: the majority of severe, life-altering injuries occur within the perceived safety of one’s own home. A hip fracture is not a minor event; it is a pivotal moment that often marks the beginning of a steep decline in health and independence. The statistics are a clear and urgent call to action. The home environment, with its familiar but often overlooked hazards, is the primary theater for these preventable tragedies.
The numbers from public health organizations paint a stark picture of this indoor epidemic. For older adults, falls are the leading cause of fatal and non-fatal injuries. Specifically for hip fractures, the data is unequivocal. Research from the CDC shows that falls cause the overwhelming majority of these injuries, with data from 2019 indicating falls were responsible for 83% of hip fracture deaths and 88% of emergency department visits for hip fractures. These aren’t just statistics; they are families upended by a trip over a rug or a slip in a poorly lit corridor.
Why is the home so treacherous? Because it breeds complacency. A slightly curled rug edge, a stack of books by the bed, or a shadowy staircase are seen as part of the landscape, not as active threats. For an aging body, however, changes in gait, vision, and reaction time turn these minor issues into critical environmental failure points. A multi-level home multiplies these risks exponentially with every single stair. Understanding that the most significant threat is indoors is the first, non-negotiable step in shifting from passive hope to proactive fall-proofing. The battle for your parents’ long-term health is won or lost in the hallways and rooms they navigate every day.
How to Declutter Hallways Without Sacrificing Personal Belongings?
Hallways and staircases are the arteries of a home, and they must remain clear. For an aging parent, however, the objects that line these paths are not “clutter”; they are memories, books, and cherished items. A blunt demand to “get rid of everything” is not only insensitive but also ineffective. The strategic approach is to re-engineer the storage, not to erase the personality of the home. The goal is to create a minimum 36-inch wide clear pathway, the standard for safe passage, while honoring your parents’ connection to their belongings.
The solution lies in moving storage from horizontal surfaces to vertical ones. Low-lying furniture, stacks of magazines, and decorative items on the floor are the most common tripping hazards. By using wall space, you can preserve these items while eliminating the risk. This is not about sterile minimalism; it’s about intelligent, respectful organization. Implementing these changes systematically can transform a hazardous corridor into a safe and personal gallery.
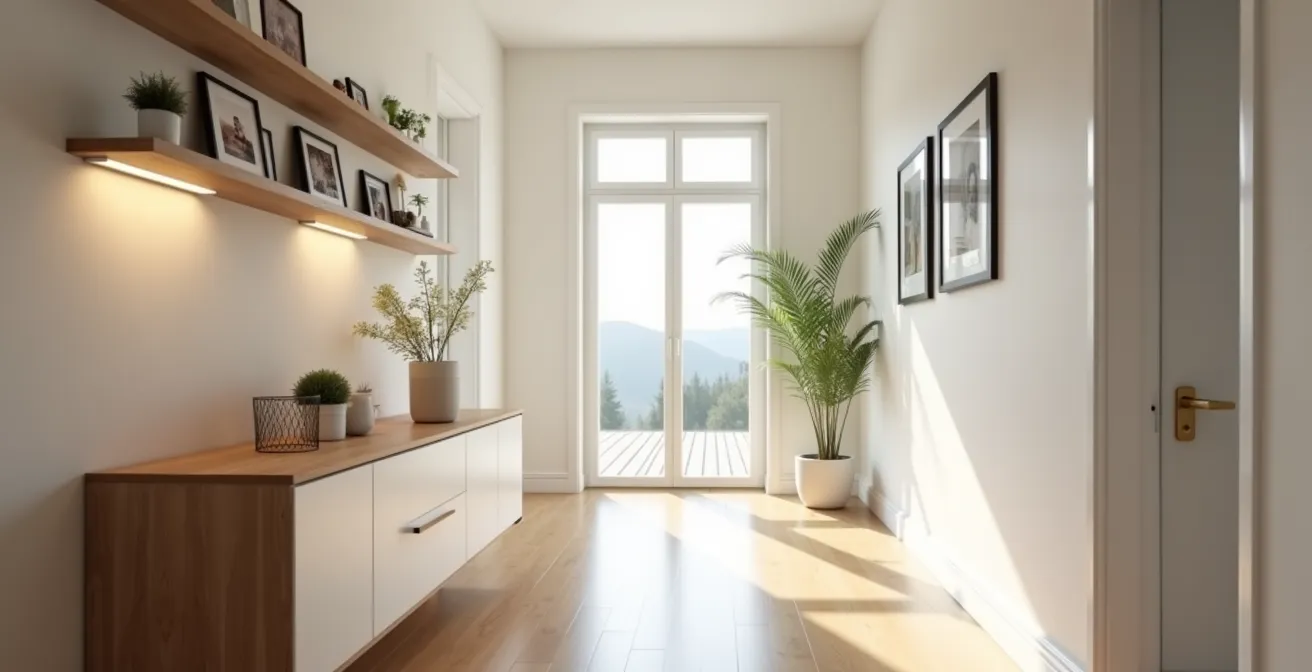
As the image demonstrates, a well-organized hallway uses vertical space effectively. Key strategies include:
- Floating Shelves: Install shelving above shoulder height to display photos and mementos, keeping them visible but out of the path of travel.
- Cord Management: Keep all electrical and phone cords close to the walls, secured with clips, and completely away from any walking paths.
- Designated Landing Zone: Create a single, organized spot near the main entrance—a narrow console table with baskets or a wall-mounted organizer—for daily items like mail, keys, and shoes.
- Strategic Furniture Placement: Ensure all furniture is arranged to maintain that critical 36-inch clearance. Remove any unnecessary tables or floor lamps from high-traffic areas.
This approach respects emotional attachments while ruthlessly prioritizing safety. The hallway is no longer a storage space; it’s a secure path of travel.
The Risk of Throw Rugs: The #1 Cause of Living Room Falls
From an auditor’s perspective, a loose throw rug is an act of negligence. It is the single most common and preventable tripping hazard in a home. Its edges curl, it bunches up, and it slides on smooth surfaces, creating an unstable surface in the middle of a walking path. While they add color and comfort, unsecured rugs are responsible for a staggering number of falls. The risk is so high that the first and best recommendation is always complete removal. For many, however, this is a non-starter due to aesthetic preference or the feel of a soft surface underfoot.
If removal is not an option, then the rug must be neutralized as a threat. This requires more than a few flimsy corner grips. It requires a systematic approach to ensure the rug becomes an immovable part of the floor. Taping down a corner is a temporary, low-grade fix that creates a false sense of security. The entire perimeter and surface of the rug must be anchored. A half-measure here is more dangerous than no measure at all, as it provides the illusion of safety while the core risk remains.
The following table outlines the hierarchy of solutions. The only acceptable options are those rated “High” or “Very High” for safety. Anything less is an unnecessary gamble with your parent’s health and mobility. A review of options from home safety resources confirms this tiered approach.
| Solution Type | Safety Level | Cost | Installation Difficulty |
|---|---|---|---|
| Full-surface rug pad | High | $30-80 | Easy |
| Corner grippers only | Low | $10-20 | Easy |
| Non-slip tape edges | Medium | $15-30 | Moderate |
| Low-profile carpet tiles | Very High | $100-300 | Professional |
The choice is clear: either secure the rug completely with a full-surface, high-grip pad that anchors the entire piece, or replace it with low-profile carpet tiles that offer a similar aesthetic without the dangerous edges. As detailed in a comparative analysis of fall prevention products, partial solutions like corner grippers are insufficient. You must eliminate the possibility of any edge lifting or the rug shifting. There is no middle ground when it comes to this particular hazard.
How to Install Motion-Sensor Night Lights to Prevent Bathroom Falls?
The nighttime journey from the bedroom to the bathroom is one of the most high-risk activities an older adult performs. It’s undertaken in a state of grogginess, often in complete or near-total darkness. Fumbling for a light switch introduces instability and delay, increasing the window of opportunity for a fall. The solution is not to leave a bright, sleep-disrupting light on all night. The solution is to create an automated “path of light” that activates instantly and intuitively, guiding the way without conscious thought.
Motion-sensor night lights are an inexpensive, high-impact technology that directly addresses this risk. These are not decorative items; they are essential safety devices. The installation strategy is critical: you are not just illuminating rooms, you are illuminating the specific path of travel. This means placing sensors at key transition points: one near the bed, one in the hallway, and one at the entrance to the bathroom. As your parent gets out of bed, the first light should activate, which then triggers the next, creating a seamless, illuminated runway.
The National Institute on Aging strongly advocates for this type of environmental modification. As their experts state in a guide to home safety:
Consider using motion-activated lights that plug into electrical outlets and automatically turn on when you walk by them to help illuminate stairwells and pathways
– National Institute on Aging, Preventing Falls at Home: Room by Room
Installation is typically simple. Most effective models are plug-in, requiring no electrical work. The key is placement. Place them in low outlets to illuminate the floor and avoid shining directly into the eyes, which can cause temporary disorientation. The goal is to provide enough light to see obstacles and navigate safely, not to flood the space with jarring brightness. This simple, automated system provides behavioral scaffolding—it supports a safe action (getting up at night) without requiring your parent to think, remember, or search for a switch.
Hip Protectors vs Fall Monitors: Which Investment Saves Lives?
The conversation around fall safety technology is often dominated by fall monitors and medical alert systems. These devices are fundamentally reactive; their primary function is to call for help *after* a fall has already occurred. While reducing the time to get help is crucial, a more urgent strategy is proactive injury mitigation. This is the role of hip protectors: padded garments designed to absorb the impact of a fall and prevent the fracture from happening in the first place. For an individual at high risk of falls or with osteoporosis, this is a life-saving distinction.
A fall monitor is a safety net. A hip protector is armor. The choice between them—or the decision to use both—depends on a clear-eyed assessment of the primary risk. Is the main concern that a parent living alone might fall and be unable to get help? A fall monitor is essential. Is the main concern that any fall, even with help nearby, is likely to result in a hip fracture due to bone fragility? A hip protector becomes the priority investment. Evidence shows they can be highly effective, reducing the risk of hip fracture by as much as 60% when worn during a fall.

The decision requires a frank look at the trade-offs, including cost, user compliance, and primary function. User comfort and willingness to wear the device are major factors, particularly for hip protectors. Modern designs are increasingly discreet and comfortable, but compliance can still be a challenge. The following comparison, based on data from organizations like the National Council on Aging, breaks down the key differences:
| Feature | Hip Protectors | Fall Monitors |
|---|---|---|
| Primary Function | Injury mitigation | Emergency response |
| Best For | High osteoporosis risk | Living alone, dizzy spells |
| Cost Range | $40-150 per pair | $20-50/month |
| User Compliance | 50-70% (comfort issues) | 80-90% (less intrusive) |
| Evidence Base | Reduces hip fracture by 60% when worn | Reduces time to help by 80% |
Ultimately, a comprehensive safety plan may involve both. However, the mindset must shift from merely planning for an emergency response to actively preventing the catastrophic injury itself. For the most vulnerable individuals, preventing the fracture is the goal that saves lives and preserves independence.
How to Safe-Proof the “One-Leg Stand” Exercise in Your Kitchen?
Maintaining and improving balance is a critical component of fall prevention. Exercises like the one-leg stand are frequently recommended by physical therapists to build stability. However, performing these exercises in an unsecured environment can paradoxically increase the risk of a fall. The kitchen, with its hard surfaces and abundance of sturdy countertops, is often the most convenient place for these daily routines. The task, then, is to engineer a dedicated, balance-compromised zone within the kitchen that makes the exercise safe and effective.
The principle is to use the environment as a supportive scaffold. Instead of practicing in an open space, the exercise should be done in a corner where two counters meet at a 90-degree angle. This provides a “cockpit” of support on two sides, allowing your parent to instantly stabilize themselves with their hands if they lose balance. The environment should be meticulously prepared to eliminate all other variables. This means clearing a 3-foot radius of any mats, pets, or other obstacles and ensuring the floor surface is dry and non-slip.
Integrating this exercise into an existing daily habit, such as waiting for the coffee to brew or food to heat in the microwave, dramatically increases compliance. This concept of linking new health behaviors to established routines is a cornerstone of successful evidence-based programs like EnhanceFitness, which focus on dynamic and static balance work in a structured setting. To create a safe home training zone, follow these steps:
- Position in a Corner: Stand in a corner where two countertops meet, providing support on two sides.
- Ensure Proper Height: The counter should be roughly at elbow height to provide a natural and stable handhold.
- Clear the Zone: Remove any rugs, cords, or obstacles within a 3-foot radius.
- Use a Non-Slip Mat: Place a small, high-grip, non-slip mat directly under the standing foot.
- Progress Gradually: Start with two-hand support, progress to one hand, then just fingertips, and finally to no hands.
- Hold and Build: Begin by holding the one-leg stand for 10 seconds, gradually building up to 30 seconds on each leg.
This turns a risky activity into a safe, repeatable, and highly effective part of a daily fall prevention strategy.
How to Program Motion Sensors to Light the Path to the Bathroom?
Basic motion-sensor night lights are a good first step. A truly robust system, however, is a ‘smart’ one that creates a coordinated cascade of light. The goal is to have the path illuminate sequentially, one step ahead of your parent, creating an intuitive and seamless experience that requires zero interaction. This advanced setup uses a central smart hub to control multiple lights and sensors, turning a simple safety measure into a sophisticated, automated guidance system. This is especially critical in a multi-level home where stairs are part of the nighttime path to the bathroom.
Programming this system requires a meticulous approach. The first step is to establish lighting zones: the bedroom, the hallway, the top/bottom of the stairs, and the bathroom entryway. Each zone will have its own sensor and light source. The key is to program a sequential trigger delay. When the bedroom sensor detects movement (e.g., feet hitting the floor), its light turns on instantly. Two seconds later, the hallway light activates. Two seconds after that, the bathroom light comes on. This cascade draws the person forward along a pre-lit path.
Advanced settings are crucial for reliability and to avoid false alarms. The sensor sensitivity must be programmed to detect slow movement, but the sensor height should be positioned around 3-4 feet to avoid being triggered by pets. The “on-time” for the bathroom zone should be longer—at least 15 minutes—to prevent the lights from turning off prematurely. A critical override should also be programmed: if a fall is detected by a separate wearable device, all lights in the path should immediately turn on to 100% brightness to assist both the fallen individual and any responding help. This level of detail transforms lighting from a convenience to a core part of an intelligent home safety ecosystem.
Action Plan: Smart Lighting Cascade Setup
- Install a Hub: Choose and install a smart home hub that is compatible with a wide range of lighting and sensor brands.
- Create Zones: Define and set up distinct lighting zones in your smart hub app (e.g., Bedroom, Hallway, Bathroom Entry).
- Program Delays: Set sequential trigger delays for the zones along the path (e.g., Hallway triggers 2 seconds after Bedroom).
- Adjust Sensitivity: Program sensor sensitivity to detect slow walking speeds while positioning them 3-4 feet high to ignore pets.
- Set On-Time and Overrides: Program a minimum on-time of 15 minutes for the destination zone and create an emergency override to turn all lights to full brightness if a fall is detected.
Key takeaways
- The overwhelming majority of severe falls happen inside the home; treating it like a system with failure points is the only effective prevention strategy.
- Systematic fixes—clearing pathways, securing all rugs, and automating lighting—are non-negotiable basics for any home audit.
- Proactive equipment like hip protectors, which prevent injury, should be prioritized over reactive systems like fall monitors for high-risk individuals.
How to Prepare for an Occupational Therapy Home Assessment?
The steps outlined in this guide provide a powerful foundation for improving home safety. However, the definitive action is to engage a professional. An Occupational Therapist (OT) specializing in home safety can perform a comprehensive assessment that is tailored to your parents’ specific medical conditions, behaviors, and the unique layout of their home. Your role is to prepare for this assessment meticulously, enabling the OT to make the most accurate and impactful recommendations possible. An unprepared visit is a wasted opportunity.
The most common mistake is to “clean up” before the therapist arrives. This is counterproductive. The OT needs to see the home in its everyday state of use to identify the real-world hazards your parents navigate daily. Your preparation should focus on providing context and clarifying goals. What are the most difficult tasks they perform? Where do they feel most unstable? What is the ultimate goal—is it to safely navigate the stairs, or to be able to cook a meal independently?
This preparation turns the assessment from a simple inspection into a collaborative strategic session. The financial stakes are enormous; the CDC estimates the financial toll for older adult falls is expected to reach $100 billion by 2030. An OT assessment is one of the most effective investments you can make to prevent these costly and devastating events. Use the following checklist to prepare a comprehensive briefing for the therapist.
Your Action Plan: Preparing for the OT Home Assessment
- Document Challenges: Use your phone to video your parent performing their three most challenging daily tasks. This provides objective evidence.
- Define Goals: Create a short, written brief focused on desired outcomes (e.g., “Goal: for Mom to be able to use the upstairs bathroom safely at night”).
- Don’t Clean or Reorganize: Present the home in its typical, everyday state. The therapist needs to see the real-world environment.
- Compile Information: Make a complete list of all current medications (which can affect balance) and any mobility aids already in use.
- Track Problem Times: Note the specific times of day when your parent experiences the most difficulty or feels most fatigued.
To secure your parents’ future in their home, the next logical step is to schedule this professional evaluation. Use the information you’ve gathered from this guide to have a productive, goal-oriented conversation with a certified Occupational Therapist or home safety specialist.