In summary:
- The open design of modern homes creates subtle but significant fall risks that go beyond obvious clutter.
- Identifying these hazards requires an “auditor’s eye” focused on the interaction between a person and their environment.
- Key areas to inspect are small level changes (thresholds), countertop heights, doorknob styles, and the way light creates shadows on steps.
- Simple modifications, like adding a threshold ramp or changing a doorknob, can dramatically improve home safety and accessibility.
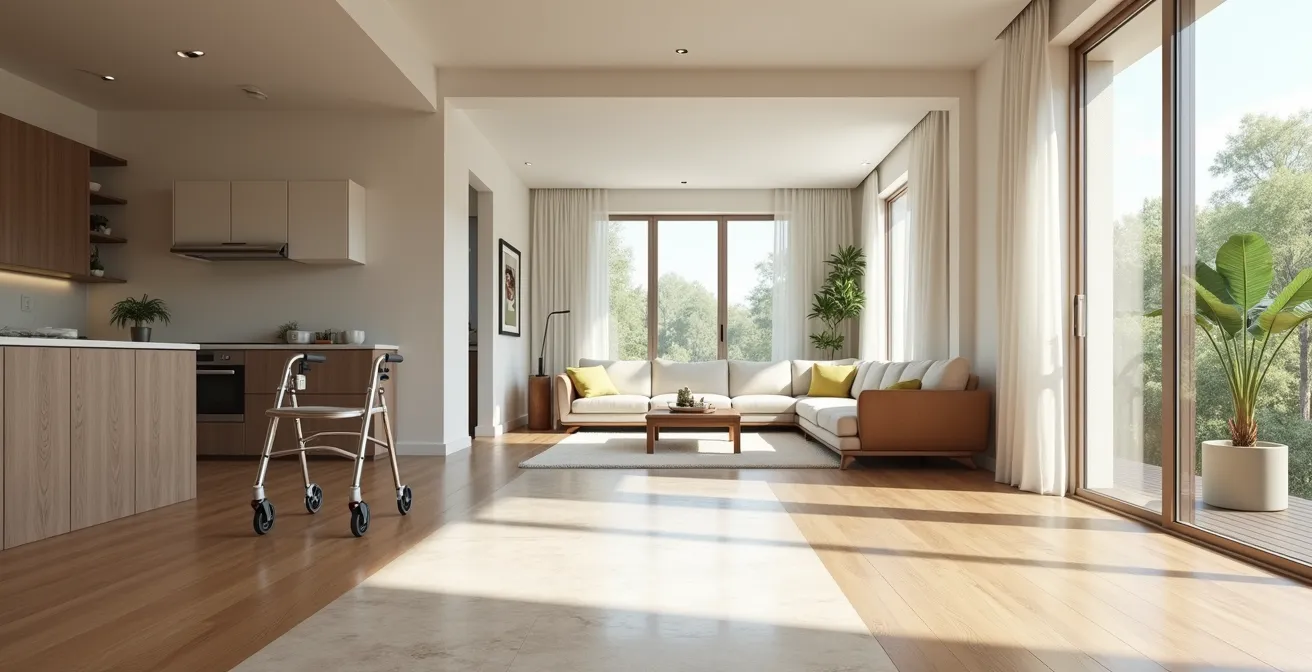
The appeal of an open-concept home is undeniable: bright, spacious, and perfect for modern living. However, for seniors or those with changing mobility, this architectural trend can mask a series of “navigational blind spots”—subtle, almost invisible hazards that an auditor’s eye is trained to find. While most home safety advice focuses on removing obvious clutter like throw rugs and electrical cords, it often overlooks the risks created by the very structure of the home itself. These are the dangers that don’t announce themselves, like a one-inch drop between rooms that is seamless to the eye but a major obstacle for a shuffling gait, or a stylish round doorknob that becomes impossible to turn with arthritic hands.
The truth is, a truly safe home isn’t just tidy; it’s ergonomically and perceptually aligned with its inhabitant’s capabilities. This involves scrutinizing the “micro-transitions” in flooring, the “ergonomic mismatch” of standard fixtures, and the crucial role of “light-shadow definition” in making pathways clear. Instead of simply looking for things to remove, this audit-based approach teaches you to see your home through a new lens: one that evaluates how every surface, fixture, and shadow impacts the path of travel. This guide will walk you through that professional auditing process, revealing how to identify and rectify these hidden hazards, transforming your open space from a potential risk into a truly safe and accessible environment.
This article provides a detailed audit of the most common hidden hazards in open-concept homes. Below is a summary of the key areas we will inspect to enhance safety and accessibility.
Summary: A Room-by-Room Guide to Uncovering Hidden Fall Risks
- Threshold Ramps: How to Fix a 1-Inch Drop Between Rooms?
- Kitchen Counters: Why Varied Heights Help Sit-Down Food Prep?
- Levers vs Knobs: Why Arthritis Makes Round Knobs Impossible?
- The Risk of Shadows: Positioning Lights to Define Step Edges
- Toe Kicks and Knee Space: Modifying Cabinets for Wheelchair Approach?
- How to Program Motion Sensors to Light the Path to the Bathroom?
- Door Widening and Ramps: The Hidden Costs of Power Chairs
- How to Widen a Doorway Without Moving Load-Bearing Walls?
Threshold Ramps: How to Fix a 1-Inch Drop Between Rooms?
In an open-concept space, the flow is everything. But that flow is often interrupted by a “micro-transition”—a small, seemingly insignificant change in floor level between rooms. A drop of just one inch from a tiled kitchen to a hardwood living area can be a major tripping hazard, especially for those with a shuffling gait or vision impairment. These thresholds are classic navigational blind spots. Since an overwhelming 90% of seniors prefer to remain at home as they age, addressing these small but critical details is paramount for long-term safety.
The most direct solution is a threshold ramp. These are not the large, exterior ramps one might picture; they are small, low-profile wedges designed specifically for interior doorways. The goal is to create a smooth, gradual transition that eliminates the abrupt edge. There are several options to consider, ranging from simple placement to permanent installation. A portable rubber ramp is an easy, no-tool solution. For a more secure fit, an aluminum ramp can be screwed down and often features a high-traction surface for added safety. These are lightweight yet strong. The ideal, albeit most intensive, solution is to re-level the subfloor during a renovation to create a true zero-threshold transition, permanently removing the hazard.
Ultimately, selecting the right ramp depends on the height of the threshold and whether a permanent or portable solution is needed. Even the simplest option provides a significant safety upgrade over an exposed ledge.
Kitchen Counters: Why Varied Heights Help Sit-Down Food Prep?
A standard kitchen is designed for a standing user of average height, with countertops typically fixed at 36 inches. This creates a significant ergonomic mismatch for anyone who needs to or prefers to work while seated, whether due to fatigue, balance issues, or wheelchair use. In an open-concept home where the kitchen is a central hub, making it accessible for seated tasks is crucial for independence. The solution lies in creating varied-height work surfaces to establish a “seated work triangle.”
This involves creating at least one section of countertop that is lower than the standard height. An ADA-compliant counter, for example, allows for knee space underneath and a more comfortable working position. But even without a full renovation, this can be achieved. A sturdy kitchen cart with locking wheels can serve as a portable, adjustable-height workspace. Moving frequently used items like pots, pans, and common ingredients to lower, easily accessible shelves further enhances this seated work zone. By placing a lower counter or cart adjacent to an under-counter microwave and pull-out pantry shelves, you minimize the need to stand and move between tasks, creating a safer, more efficient workflow for seated food preparation.
The following table compares different solutions for creating accessible counter space.
| Solution Type | Height Range | Installation | Cost |
|---|---|---|---|
| Standard Counter | 36 inches | Permanent | $$$ |
| ADA-Compliant Lower Counter | 28-34 inches | Permanent | $$$$ |
| Kitchen Cart with Locking Wheels | Adjustable 32-36 inches | Portable | $$ |
By incorporating varied heights, the kitchen transforms from a rigid, standing-only environment into a flexible space that supports energy conservation and safe, independent living.
Levers vs Knobs: Why Arthritis Makes Round Knobs Impossible?
The standard round doorknob is a classic example of an ergonomic mismatch that becomes painfully obvious with age. For a person with arthritis, diminished grip strength, or hand tremors, the fine motor skills and twisting force required to operate a round knob can be difficult, painful, or simply impossible. With nearly 54 million adults in the U.S. having doctor-diagnosed arthritis, this is a widespread and significant barrier to accessibility within the home.
The solution is simple, effective, and relatively inexpensive: replacing round knobs with lever-style handles. A lever handle can be operated with a closed fist, an elbow, or a light push of the hand, requiring minimal grip strength. This simple swap can be transformative for daily independence. As Accessibility Research notes in the Step2Health Blog:
Studies indicate lever-style door knobs reduce the effort needed for operation by about 50%.
– Accessibility Research, Step2Health Blog
This change eliminates a major point of frustration and physical strain, making it easier to move freely between rooms, especially in an emergency. The visual difference highlights the core of the issue: one design demands dexterity, while the other accommodates physical limitations.
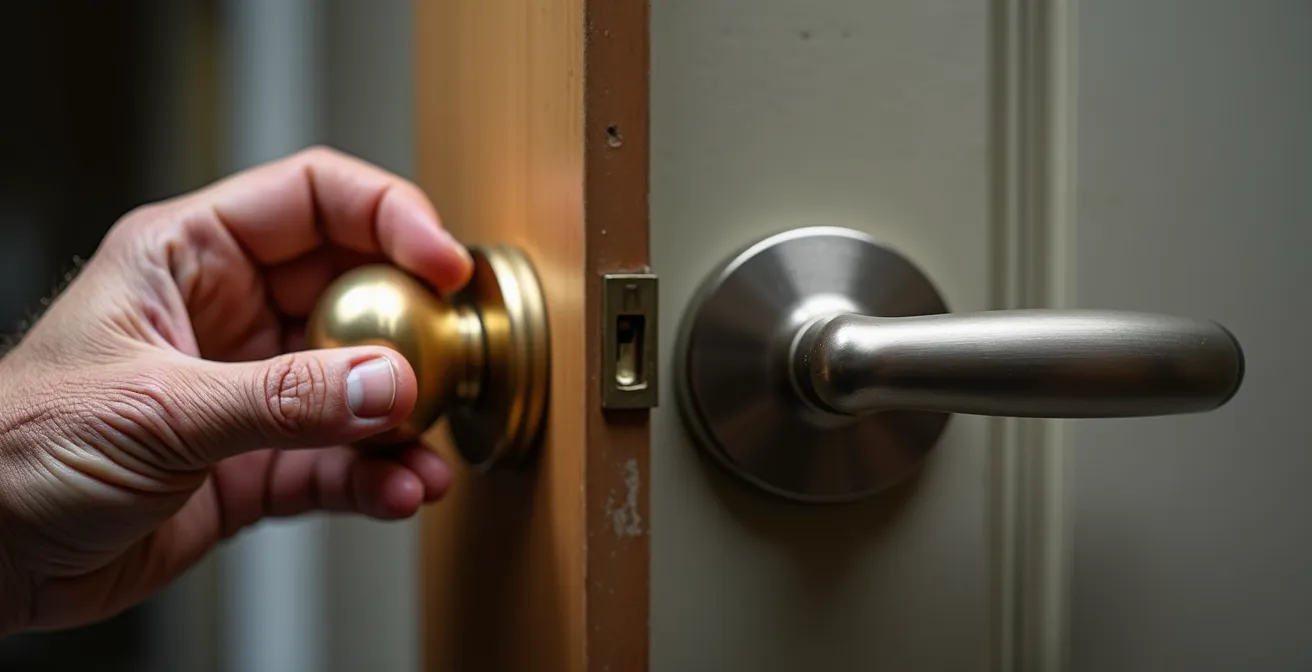
As this image demonstrates, the lever removes the need for a pinching and twisting motion, replacing it with a simple downward push. This principle should be applied not just to doors but also to faucets and cabinet handles throughout the home to create a consistently accessible environment.
It’s a small detail that makes a world of difference in preserving autonomy and ensuring every part of the home is easily reachable.
The Risk of Shadows: Positioning Lights to Define Step Edges
In home safety, light is not just about general illumination; it’s about definition. An evenly washed space might feel bright, but it can flatten perception and hide dangers. The greatest risk comes from shadows that obscure edges, creating navigational blind spots exactly where clear vision is most needed—at stairs and level changes. A poorly positioned overhead light can cast a shadow on the top or bottom step of a staircase, making it seem to disappear. Proper light-shadow definition is a critical, yet often overlooked, component of fall prevention.
A successful lighting plan uses layers to ensure safety. This includes ambient (general) lighting for overall visibility, task lighting for specific areas like kitchen counters, and—most importantly for fall prevention—accent lighting. Accent lighting, such as linear LED strips installed along the edge of each step or under the railing, provides direct, low-level illumination that clearly defines the path of travel. It eliminates shadows and creates sharp contrast between the tread and the riser. Motion-sensor night lights in hallways and on stairs are also excellent additions, as they provide instant, hands-free light when needed. These are among the most commonly recommended products to reduce navigating in the dark and prevent falls. For nighttime navigation, a warmer color temperature (around 2700K) is less jarring to the eyes and helps preserve night vision while still providing adequate illumination.
Audit Checklist: Evaluating Light-Shadow Definition for Safety
- Pathways of Travel: Identify all main routes (e.g., bed to bathroom, couch to kitchen) and check for shadows cast across them at different times of day.
- Transition Points: Inventory all level changes, including single steps and thresholds, and assess if their edges are clearly lit or lost in shadow.
- Task Areas: Confront the lighting in key work zones (counters, reading chairs, desks) with the tasks performed there. Is the light direct and does it minimize hand shadows?
- Glare & Contrast: Evaluate all light sources for disabling glare. Check if there is a sharp, memorable contrast between a step’s edge and the floor, or if it’s a generic wash of light.
- Integration Plan: Create a prioritized list of areas to add accent or task lighting, such as installing LED strips on stairs or adding under-cabinet lights in the kitchen.
By thinking of light as a tool to create contrast, you can actively design a visual environment that guides movement and eliminates perceptual uncertainty.
Toe Kicks and Knee Space: Modifying Cabinets for Wheelchair Approach?
For a wheelchair user, standard cabinetry presents a physical wall. The “toe kick”—the recessed area at the bottom of base cabinets—is designed for standing users, not for the front of a wheelchair’s footrests. This lack of knee and toe clearance prevents a person from getting close enough to the counter or sink to work comfortably and safely. To make a home truly accessible, key workstations must be modified to create “docking stations” where a wheelchair can approach directly.
The primary task areas to address are the kitchen sink, a food preparation counter, and the bathroom vanity. A full renovation might involve installing sections of ADA-compliant cabinetry with open space underneath. However, effective modifications can often be made to existing cabinets. Removing the doors and lower shelves from the cabinet under a sink or a section of counter creates immediate, temporary knee space. When modifying a sink cabinet, it’s critical to insulate any exposed hot water pipes to prevent leg burns and to re-route the P-trap as far back as possible to maximize clearance. The goal is to ensure all paths should be at least 3 feet wide for maneuverability, but the approach to workstations needs dedicated clearance.
For a less permanent solution, a height-appropriate table or a rolling cart with locking wheels can be used in place of a modified cabinet section. This provides a flexible workspace that can be moved as needed. By strategically creating these areas of approach, you transform a standard room into an inclusive environment that empowers wheelchair users to perform daily tasks with safety, dignity, and independence.
This proactive approach ensures that the most essential areas of the home are not just reachable, but fully usable.
How to Program Motion Sensors to Light the Path to the Bathroom?
Nighttime trips to the bathroom are a high-risk time for falls. Navigating in the dark or being jolted awake by a harsh, bright overhead light can lead to disorientation and missteps. An advanced solution that goes beyond a simple night light is to create a “lighting relay race”—a sequence of motion-activated lights that create a gentle, guided journey from the bedroom to the bathroom. This automated path of travel minimizes disruption to sleep while ensuring a safe passage.
This system uses a series of small, smart motion sensors placed at key points along the route. The sequence is programmed to be intuitive and gentle. For instance, as a person gets out of bed, a sensor activates a soft light in the bedroom, just bright enough to see. As they move into the hallway, a second sensor detects their movement and illuminates the hall path, while the bedroom light behind them begins to dim. Finally, as they approach the bathroom, a third sensor turns on a low-level light inside, and the hallway light fades. This sequential activation prevents the jarring experience of walking from darkness into a brightly lit room. It creates a continuous, flowing path of light that guides the user without overwhelming their night vision.

As shown, low-level LED strips along baseboards are an excellent way to implement this system. They illuminate the floor directly where it’s needed, defining the path without causing glare. The goal is a seamless, intuitive experience where the environment anticipates the user’s needs, providing light exactly when and where it’s required for safe movement.
This proactive approach to lighting is a powerful tool in automated fall prevention, offering both safety and peace of mind.
Door Widening and Ramps: The Hidden Costs of Power Chairs
Transitioning to a power chair can significantly enhance mobility, but it comes with spatial demands that often exceed those of a manual wheelchair. The primary difference is the turning radius; many power chairs require a 50- to 60-inch-wide space to make a 180-degree turn, which can make navigating standard hallways and doorways in an older home impossible. While the cost of the chair itself is a known expense, the “hidden costs” of home modification are often overlooked and can be substantial.
Beyond installing ramps and widening doorways, adapting a home for a power chair involves addressing wear-and-tear and spatial redesign. Hallways may need to be widened, which can be a major structural project. To protect walls from constant bumps and scrapes, installing clear polycarbonate corner guards is a wise investment. The increased weight and traffic from a power chair also put significant stress on flooring; upgrading to heavy-duty, scratch-resistant flooring like luxury vinyl plank (LVP) is often necessary. Finally, a dedicated, accessible charging station with a properly placed outlet must be installed. These modifications add up quickly, turning the acquisition of a power chair into a significant home renovation project.
This table outlines some of the potential hidden costs associated with accommodating a power chair, based on a cost analysis of home modifications.
| Cost Category | Description | Estimated Cost |
|---|---|---|
| Spatial Redesign | Hallway and room modifications for turning radius | $5,000-15,000 |
| Wall Protection | Installing clear polycarbonate wall corner guards | $500-1,000 |
| Flooring Upgrade | Heavy-duty LVP to handle increased wear | $3,000-8,000 |
| Charging Station | Dedicated accessible power outlet installation | $300-800 |
Understanding these potential expenses upfront allows for better financial planning and ensures the home is truly ready to support this important mobility tool.
Key Takeaways
- True home safety for seniors requires looking beyond clutter to identify “invisible” structural hazards like small level changes and poor lighting.
- Many high-impact safety improvements are not expensive renovations but simple, ergonomic fixes like swapping round doorknobs for levers.
- Lighting should be used strategically to create clear definition and contrast at steps and edges, not just for general brightness.
How to Widen a Doorway Without Moving Load-Bearing Walls?
A narrow doorway is one of the most definitive barriers to accessibility, effectively cutting off access for wheelchair and walker users. While widening a doorway in a load-bearing wall is a complex job that requires a qualified contractor, there are several effective, less invasive strategies to try first. These methods can often add the crucial few inches needed for clearance without undertaking a major structural project.
The simplest and most effective trick is to replace standard door hinges with offset or swing-clear hinges. These special hinges are designed to swing the door completely clear of the doorway, adding up to two inches of usable space. Another easy fix is to remove the door stop molding from the frame, which can also add an extra inch of clearance. In some cases, if the existing door is particularly thick, replacing it with a thinner model may be feasible. For non-essential doors, such as one leading to a formal dining room that is rarely closed, removing the door entirely to create a wider cased opening is a practical option. A pocket door, which slides into the wall cavity, is another excellent solution, though it requires a more involved installation.
As the home safety experts at Age Safe America state, the ideal home is built with accessibility in mind from the start.
Single-story, open-concept homes are best.
– Age Safe America
However, for existing homes, these incremental modifications are key. By starting with these low-cost, high-impact solutions, it is often possible to achieve the necessary clearance and maintain full access throughout the home without the expense and disruption of moving walls.
Evaluating and implementing these doorway solutions is a critical final step in creating a home that is not just open in concept, but truly open to everyone.